The goal of these labs are to practice using PyScriptor gain experience using the coding language required to run the Python Scripts, and to become familiar with the ArcPy Extention package. Python is a useful resource that allows the user to automate geospatial processes that could otherwise be completed manually in ArcMap. Knowing these scripts can be saved and ran again in the future save GIS users time, and saves them from running into potential issue by allowing the user to keep their processes consistent.
Exercise 5, Part 2: Gathering Data
During this lab I practiced downloading data from different sources. Once the data was organized within ArcCatelog, I located three rasters from different locations and save them into one new common location, along with a geodatabase. From here, I began using PyScripter.
To begin, I set up the system modules, followed by setting up the workspace environment. This is where I navigated to the common folder location of the three rasters. Next, I set up a Loop followed by setting a up the ListOfRaster, allowing me to move these three rasters into a new folder. After this was completed the rasters were projected in the same coordinate system as one of the features in the Trempealeau County gdb using the ProjectRaster_management function. Once this was complete the raster were extracted to the to the county boundaries feature class, giving the outputs the shape of this feature. Lasting, using the RasterToGeodatabase function I was able to move my final output into the Trempealeau County gdb. The output maps can be view in blog post: gathering data.
Exercise 7, Part 1: Network Analysis, Data Preparation

Before I began writing this script, I copied the all_mines feature class into my file exercise 7 geodatabase. At the beginning of the Python script, I set my workspace to this geodatabase so all outputs would be saved to this location. After this step, I set up the variables that I planned to use through of this script. This consisted of a list of feature classes that I intended to generate during the script, and their associated key word.
After this step, I created an SQL statement, which was used to query out my desired features. The first SQL query all active mines, the second statement query all mines from a facility with the word "mine" in the title, and the third statement to query all mines from a facility that did not have the word "rail" in the title. After these scripts were complete, I used the MakeFeatureLayer_Management tool to create three separate layers from the previous selected features.
Next, I use the SelectLayerByLocation_Management tool to select all mines that are within the state of Wisconsin, by choosing the mines that intersect it. Following this, I used the SelectLayerByLocation_management tool to remove all mines from this previous selection that are within a 1.5 km distance. Lastly I ran the CopyFeatures_management tool to copy the selection to a new final feature class called mines_norail_final.
Exercise 8, Raster Analysis
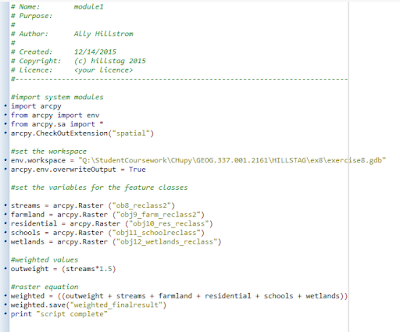
This script is an extension of exercise 8, where we were able to create a risk output that put varied weights of the factors that make up the final output. Here, I brought in the spatial analysis package, specified which raster features should be included in the model. I was then able to specify different weights of the input factors. I chose to give streams a higher weight in this case, however, the other factors of residential, farmland, wetland, and school were all still used in the model. The output of the model can be viewed in my exercise 8 blog.


No comments:
Post a Comment